Whenever we used to travel overseas, I’d keep a little notebook with me and divide it into 3 sections:
- things to do
- day to day notes – there’s nothing worse than getting back and whole days of your holiday are blank because you didn’t take notes
- budgets or what we spend daily (we like to have an average daily budget)
Sometime last year I saw a scrapbook travel journal and I was inspired. Hers was a lot more scrapbooky for my taste but I loved the idea of capturing memories on the day itself and just putting the photos in when you get back from your holiday.
After all, I was used to doing the daily writing anyway.
So eventually I had all the supplies and to be honest, I only assembled the book on our first night on holiday but at least everything was ready.
Supplies
- Chipboard covers
- Binder rings
- Two-hole punch
- Scrapbook paper
- Cardstock or project board
- Notebook paper – I used a graph book for the budget papers
- Stamps
- Glue
- Photos
- Number stickers (before I saw these, I was going to use plain circle stickers and write the numbers on them)
How to make
- Decide how big you want your journal. I initially used one double spread per day we were away but then later after going through all the pics, added another four pages.
- Lay everything out first to make sure what’s in your head works out visually too. I had to change some papers here and there because the colours didn’t look good together.
- When you’re happy, punch the paper and bind with binder rings.
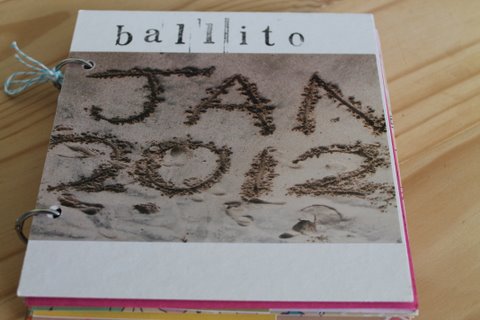
- I saw the idea for the cover page ages ago (I think on Becky Higgins’s blog) so I made sure to take that photo on day 1.
- I wrote in my book every night, sometimes I had to catch up two nights.
- I made a separate folder within my Ballito folder called scrapbook and dragged the pics I needed to print. Sometimes I cheated and made collages when I couldn’t decide on one pic.
- I tried various methods of sticking the photos to the pages – the one that worked best for me was putting glue on the page and then affixing the photo.
- A normal glue stick works better than liquid glue, double-sided tape or those sticky dots. Nice to know cheaper is still best 🙂
- And there it is – a quick way of capturing our memories – in all its imperfect glory.
- We all LOVE it – me, D and the kids keep paging through it and best of all, because it’s not perfect, I’m not at all precious about people (two and a half year old twins!) touching it 🙂

 |
| bakers twine from In Good Company – I won’t tell you how much I spent when I went but it was three times what I’d budgeted. |


 |
| examples of the extra pages I added |
 |
| the “splash” card is a free download from Monika Wright |

 |
| I had a little man wanting in on the photo action |
 |
| this is what all the journalling pages look like – words on one side and pic on the other |
This was undoubtedly one of the best ideas I’ve ever had and I will definitely be making more for gifts and for our future trips.
I still have not blogged or posted pics of half of our travels from 2008 and 2009 but if I’d had little books like these I know they would have been DONE by now! I used to blog ours but it got away from us.
How do you document your travel (international and domestic) adventures?
What do you think of my little book?
PS please spare a thought for my friend, Beth. It’s one year today since her son died so tragically.


